


In the daily operations of a steel mill or a construction site, hardness testing is far more than a routine check—it’s the fastest way to verify if a pipe is actually fit for purpose. Whether you are inspecting LSAW for a high-pressure line or hollow sections for a stadium frame, the hardness value tells you exactly how the steel was treated and how it will behave under stress.
Here is the technical reality of how we measure it and why it matters to your bottom line.

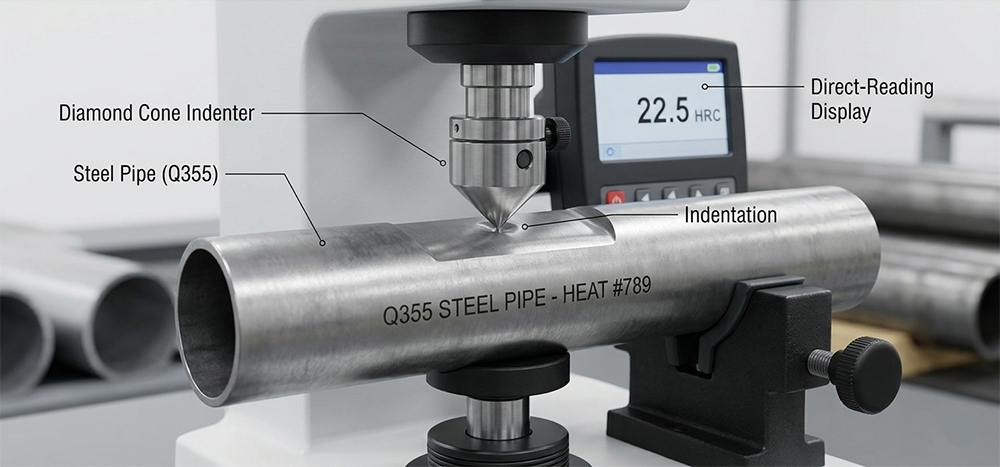
Figure 1. Hardness testing of carbon steel pipe in our laboratory.
Why We Can’t Ignore Hardness
Hardness isn’t just about surface resistance; it’s a non-destructive “shortcut” to understanding a pipe’s mechanical soul.
Strength Estimation: There is a direct, linear link between hardness and tensile strength (Rm). In the field, we often use the rule of thumb Rm≈ 3.45× HB to get a quick strength estimate without needing a full tensile test.
Catching Heat Treatment Errors: If a batch of ASTM A106 was supposed to be normalized but came out too hard, the testing reveals that the cooling rate was off or the furnace temperature was uneven.
The “Weakest Link” (Welds): In welded pipes like ERW or SSAW, the Heat Affected Zone (HAZ) is the danger zone. If this area gets too hard, it becomes brittle. In oil and gas “sour service,” an overly hard weld is a magnet for Hydrogen-Induced Cracking (HIC).
The Big Three: Which Method Should You Use?
1. Brinell (HBW) – Best for Bulk Materials
For raw steel plates and thick-walled pipes, Brinell is the gold standard. It uses a 10mm tungsten carbide ball and a heavy load (up to 3000kg).
Why it works: The large indentation averages out the steel’s grain structure, giving you a representative “bulk” reading rather than a localized anomaly.
The Formula:

2. Rockwell (HRB/HRC) – The Production King
If you need results in seconds on a high-volume line, Rockwell is the answer. It’s a direct-reading method that doesn’t require optical measurement.
HRB: Ideal for mild steels like Q235.
HRC: Necessary for high-strength pipeline steels (like API 5L X70) or quenched components.
3. Vickers (HV) – The Lab Precisionist
Vickers uses a diamond pyramid and is usually reserved for the lab. If you need to map the hardness gradient across a narrow weld seam to find the exact spot where the steel became brittle, Vickers is the only tool for the job.
Reference Table: Typical Hardness by Grade
While specific MTR (Mill Test Report) values vary, here are the benchmarks we look for in common grades:
|
Grade |
International Equivalent |
Typical Range (HBW) |
Typical Application |
| Q235B | ASTM A36 / S235 | 120 – 160 | Standard structural use |
| Q355B | S355 / ASTM A572 | 150 – 200 | High-load frameworks |
| API 5L X65 | ISO 3183 | 190 – 240 | High-pressure pipelines |
Pro Tip: For H2S “sour service” environments, NACE MR0175 standards strictly cap the hardness at 22 HRC (approx. 248 HV) to prevent Stress Corrosion Cracking.
Avoiding “Bad Data”: Field Testing Rules
To get a result that actually stands up to an audit, you have to control the variables:
1.Kill the Coating: You cannot test a galvanized pipe through the zinc. Zinc is soft and will give you a false low. You must grind the surface down to the base metal.
2.Watch the Thickness: If your wall is thin, the “anvil effect” (the hardness of the machine’s support) will bleed into your result. Your pipe wall must be at least 10 times thicker than the depth of the indentation.
3.Mind the Spacing: Don’t cluster your tests. Each hit work-hardens the steel around it. Keep your test points at least 3 diameters apart for a clean, independent reading.
Hardness testing is your primary defense against material failure. By choosing the right method—Brinell for bulk strength, Rockwell for speed, or Vickers for forensic weld analysis—you ensure that your carbon steel pipe meets the rigorous safety standards of modern engineering.
Post time: Mar-09-2026


